|
|
8 years ago | |
|---|---|---|
| .. | ||
| docs | 8 years ago | |
| examples | 8 years ago | |
| img | 8 years ago | |
| LICENSE | 8 years ago | |
| README.md | 8 years ago | |
| app.template.yaml | 8 years ago | |
README.md
Tendermint network powered by Kubernetes
This should primarily be used for testing purposes or for tightly-defined chains operated by a single stakeholder (see the security precautions). If your desire is to launch an application with many stakeholders, consider using our set of Ansible scripts.
QuickStart (MacOS)
curl -LO https://storage.googleapis.com/kubernetes-release/release/$(curl -s https://storage.googleapis.com/kubernetes-release/release/stable.txt)/bin/darwin/amd64/kubectl && chmod +x kubectl && sudo mv kubectl /usr/local/bin/kubectl
curl -Lo minikube https://storage.googleapis.com/minikube/releases/v0.17.1/minikube-darwin-amd64 && chmod +x minikube && sudo mv minikube /usr/local/bin/
minikube start

git clone https://github.com/tendermint/tools.git && cd tools/mintnet-kubernetes/examples/basecoin && make create
QuickStart (Linux)
curl -LO https://storage.googleapis.com/kubernetes-release/release/$(curl -s https://storage.googleapis.com/kubernetes-release/release/stable.txt)/bin/linux/amd64/kubectl && chmod +x kubectl && sudo mv kubectl /usr/local/bin/kubectl
curl -Lo minikube https://storage.googleapis.com/minikube/releases/v0.17.1/minikube-linux-amd64 && chmod +x minikube && sudo mv minikube /usr/local/bin/
minikube start

git clone https://github.com/tendermint/tools.git && cd tools/mintnet-kubernetes/examples/basecoin && make create
Verify everything works
Using a shell:
-
wait until all the pods are
Running.kubectl get pods -w -o wide -L tm -
query the Tendermint app logs from the first pod.
kubectl logs -c tm -f tm-0 -
use Rest API to fetch the status of the second pod's Tendermint app. Note we are using
kubectl execbecause pods are not exposed (and should not be) to the outer network.kubectl exec -c tm tm-0 -- curl -s http://tm-1.basecoin:46657/status | json_pp
Using the dashboard:
minikube dashboard
Clean up
make destroy
Usage
(1/4) Setup a Kubernetes cluster
- locally using Minikube
- on GCE with a single click in the web UI
- on AWS using Kubernetes Operations
- on Linux machines (Digital Ocean) using kubeadm
- on AWS, Azure, GCE or bare metal using Kargo (Ansible)
Please refer to the official documentation for overview and comparison of different options. See our guides for Google Cloud Engine or Digital Ocean.
Make sure you have Kubernetes >= 1.5, because you will be using StatefulSets, which is a beta feature in 1.5.
(2/4) Create a configuration file
Download a template:
curl -Lo app.yaml https://github.com/tendermint/tools/raw/master/mintnet-kubernetes/app.template.yaml
Open app.yaml in your favorite editor and configure your app container
(navigate to - name: app). Kubernetes DSL (Domain Specific Language) is very
simple, so it should be easy. You will need to set Docker image, command and/or
run arguments. Replace variables prefixed with YOUR_APP with corresponding
values. Set genesis time to now and preferable chain ID in ConfigMap.
Please note if you are changing replicas number, do not forget to update
validators set in ConfigMap. You will be able to scale the cluster up or down
later, but new pods (nodes) won't become validators automatically.
(3/4) Deploy your application
kubectl create -f ./app.yaml
(4/4) Observe your cluster
web UI <-> https://github.com/kubernetes/dashboard
The easiest way to access Dashboard is to use kubectl. Run the following command in your desktop environment:
kubectl proxy
kubectl will handle authentication with apiserver and make Dashboard available at http://localhost:8001/ui
shell
List all the pods:
kubectl get pods -o wide -L tm
StatefulSet details:
kubectl describe statefulsets tm
First pod details:
kubectl describe pod tm-0
Tendermint app logs from the first pod:
kubectl logs tm-0 -c tm -f
App logs from the first pod:
kubectl logs tm-0 -c app -f
Status of the second pod's Tendermint app:
kubectl exec -c tm tm-0 -- curl -s http://tm-1.<YOUR_APP_NAME>:46657/status | json_pp
Security
Due to the nature of Kubernetes, where you typically have a single master, the master could be a SPOF (Single Point Of Failure). Therefore, you need to make sure only authorized people can access it. And these people themselves had taken basic measures in order not to get hacked.
These are the best practices:
- all access to the master is over TLS
- access to the API Server is X.509 certificate or token based
- etcd is not exposed directly to the cluster
- ensure that images are free of vulnerabilities (1)
- ensure that only authorized images are used in your environment
- disable direct access to Kubernetes nodes (no SSH)
- define resource quota
Resources:
- https://kubernetes.io/docs/admin/accessing-the-api/
- http://blog.kubernetes.io/2016/08/security-best-practices-kubernetes-deployment.html
- https://blog.openshift.com/securing-kubernetes/
Fault tolerance
Having a single master (API server) is a bad thing also because if something happens to it, you risk being left without an access to the application.
To avoid that you can run Kubernetes in multiple zones, each zone running an API server and load balance requests between them. Do not forget to make sure only one instance of scheduler and controller-manager are running at once.
Running in multiple zones is a lightweight version of a broader Cluster Federation feature. Federated deployments could span across multiple regions (not zones). We haven't tried this feature yet, so any feedback is highly appreciated! Especially, related to additional latency and cost of exchanging data between the regions.
Resources:
Starting process
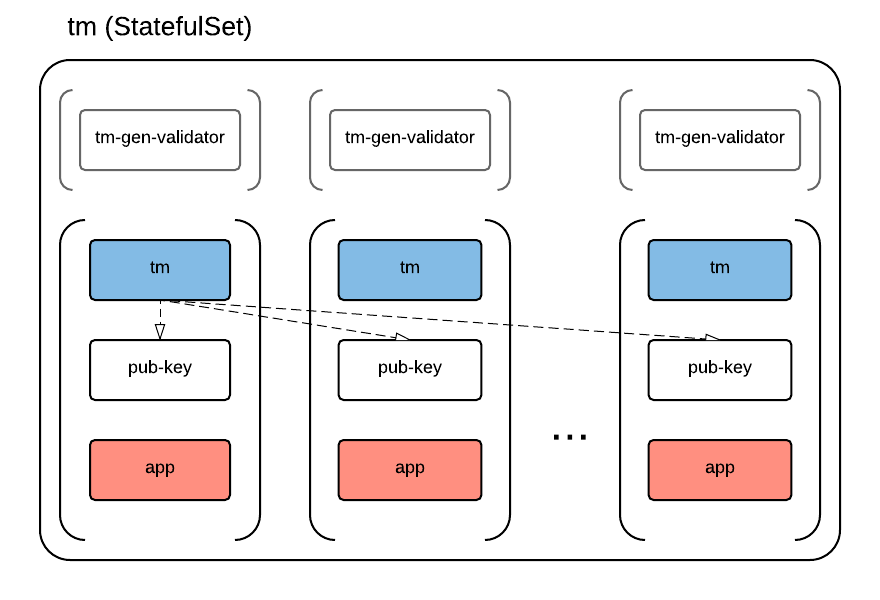
Init containers (tm-gen-validator) are run before all other containers,
creating public-private key pair for each pod. Every tm container then asks
other pods for their public keys, which are served with nginx (pub-key
container). When tm container have all the keys, it forms a genesis file and
starts Tendermint process.


