
16 KiB
Contributing
Thank you for your interest in contributing to Tendermint! Before contributing, it may be helpful to understand the goal of the project. The goal of Tendermint is to develop a BFT consensus engine robust enough to support permissionless value-carrying networks. While all contributions are welcome, contributors should bear this goal in mind in deciding if they should target the main Tendermint project or a potential fork. When targeting the main Tendermint project, the following process leads to the best chance of landing changes in master.
All work on the code base should be motivated by a Github Issue. Search is a good place start when looking for places to contribute. If you would like to work on an issue which already exists, please indicate so by leaving a comment.
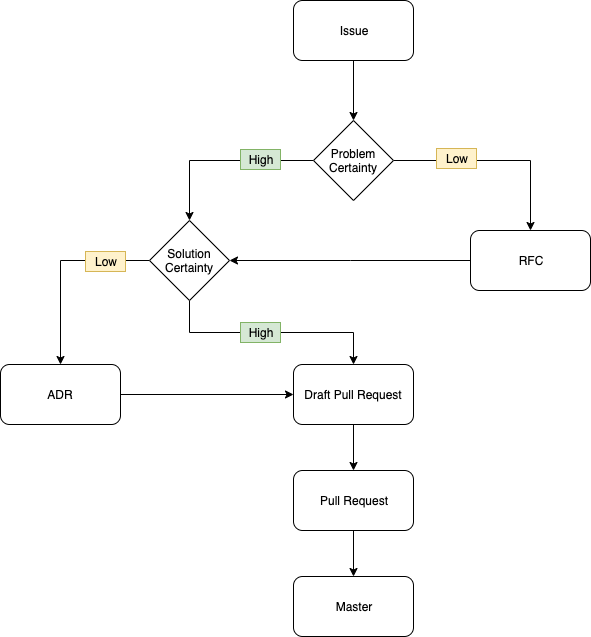
All new contributions should start with a Github Issue. The issue helps capture the problem you're trying to solve and allows for early feedback. Once the issue is created the process can proceed in different directions depending on how well defined the problem and potential solution are. If the change is simple and well understood, maintainers will indicate their support with a heartfelt emoji.
If the issue would benefit from thorough discussion, maintainers may request that you create a Request For Comment. Discussion at the RFC stage will build collective understanding of the dimensions of the problems and help structure conversations around trade-offs.
When the problem is well understood but the solution leads to large structural changes to the code base, these changes should be proposed in the form of an Architectural Decision Record (ADR). The ADR will help build consensus on an overall strategy to ensure the code base maintains coherence in the larger context. If you are not comfortable with writing an ADR, you can open a less-formal issue and the maintainers will help you turn it into an ADR.
How to pick a number for the ADR?
Find the largest existing ADR number and bump it by 1.
When the problem as well as proposed solution are well understood, changes should start with a draft pull request against master. The draft signals that work is underway. When the work is ready for feedback, hitting "Ready for Review" will signal to the maintainers to take a look.
Each stage of the process is aimed at creating feedback cycles which align contributors and maintainers to make sure:
- Contributors don’t waste their time implementing/proposing features which won’t land in master.
- Maintainers have the necessary context in order to support and review contributions.
Forking
Please note that Go requires code to live under absolute paths, which complicates forking.
While my fork lives at https://github.com/ebuchman/tendermint,
the code should never exist at $GOPATH/src/github.com/ebuchman/tendermint.
Instead, we use git remote to add the fork as a new remote for the original repo,
$GOPATH/src/github.com/tendermint/tendermint, and do all the work there.
For instance, to create a fork and work on a branch of it, I would:
- Create the fork on GitHub, using the fork button.
- Go to the original repo checked out locally (i.e.
$GOPATH/src/github.com/tendermint/tendermint) git remote rename origin upstreamgit remote add origin git@github.com:ebuchman/basecoin.git
Now origin refers to my fork and upstream refers to the Tendermint version.
So I can git push -u origin master to update my fork, and make pull requests to tendermint from there.
Of course, replace ebuchman with your git handle.
To pull in updates from the origin repo, run
git fetch upstreamgit rebase upstream/master(or whatever branch you want)
Dependencies
We use go modules to manage dependencies.
That said, the master branch of every Tendermint repository should just build
with go get, which means they should be kept up-to-date with their
dependencies so we can get away with telling people they can just go get our
software.
Since some dependencies are not under our control, a third party may break our
build, in which case we can fall back on go mod tidy. Even for dependencies under our control, go helps us to
keep multiple repos in sync as they evolve. Anything with an executable, such
as apps, tools, and the core, should use dep.
Run go list -u -m all to get a list of dependencies that may not be
up-to-date.
When updating dependencies, please only update the particular dependencies you
need. Instead of running go get -u=patch, which will update anything,
specify exactly the dependency you want to update, eg.
GO111MODULE=on go get -u github.com/tendermint/go-amino@master.
Protobuf
We use Protocol Buffers along with gogoproto to generate code for use across Tendermint Core.
For linting and checking breaking changes, we use buf. If you would like to run linting and check if the changes you have made are breaking then you will need to have docker running locally. Then the linting cmd will be make proto-lint and the breaking changes check will be make proto-check-breaking.
There are two ways to generate your proto stubs.
- Use Docker, pull an image that will generate your proto stubs with no need to install anything.
make proto-gen-docker - Run
make proto-genafter installingprotocand gogoproto, you can do this by runningmake protobuf.
Installation Instructions
To install protoc, download an appropriate release (https://github.com/protocolbuffers/protobuf) and then move the provided binaries into your PATH (follow instructions in README included with the download).
To install gogoproto, do the following:
go get github.com/gogo/protobuf/gogoproto
cd $GOPATH/pkg/mod/github.com/gogo/protobuf@v1.3.1 # or wherever go get installs things
make install
You should now be able to run make proto-gen from inside the root Tendermint directory to generate new files from proto files.
Vagrant
If you are a Vagrant user, you can get started hacking Tendermint with the commands below.
NOTE: In case you installed Vagrant in 2017, you might need to run
vagrant box update to upgrade to the latest ubuntu/xenial64.
vagrant up
vagrant ssh
make test
Changelog
Every fix, improvement, feature, or breaking change should be made in a
pull-request that includes an update to the CHANGELOG_PENDING.md file.
Changelog entries should be formatted as follows:
- [module] \#xxx Some description about the change (@contributor)
Here, module is the part of the code that changed (typically a
top-level Go package), xxx is the pull-request number, and contributor
is the author/s of the change.
It's also acceptable for xxx to refer to the relevant issue number, but pull-request
numbers are preferred.
Note this means pull-requests should be opened first so the changelog can then
be updated with the pull-request's number.
There is no need to include the full link, as this will be added
automatically during release. But please include the backslash and pound, eg. \#2313.
Changelog entries should be ordered alphabetically according to the
module, and numerically according to the pull-request number.
Changes with multiple classifications should be doubly included (eg. a bug fix that is also a breaking change should be recorded under both).
Breaking changes are further subdivided according to the APIs/users they impact.
Any change that effects multiple APIs/users should be recorded multiply - for
instance, a change to the Blockchain Protocol that removes a field from the
header should also be recorded under CLI/RPC/Config since the field will be
removed from the header in RPC responses as well.
Branching Model and Release
The main development branch is master.
Every release is maintained in a release branch named vX.Y.Z.
Pending minor releases have long-lived release candidate ("RC") branches. Minor release changes should be merged to these long-lived RC branches at the same time that the changes are merged to master.
Note all pull requests should be squash merged except for merging to a release branch (named vX.Y). This keeps the commit history clean and makes it
easy to reference the pull request where a change was introduced.
Development Procedure
The latest state of development is on master, which must never fail make test. Never force push master, unless fixing broken git history (which we rarely do anyways).
To begin contributing, create a development branch either on github.com/tendermint/tendermint, or your fork (using git remote add origin).
Make changes, and before submitting a pull request, update the CHANGELOG_PENDING.md to record your change. Also, run either git rebase or git merge on top of the latest master. (Since pull requests are squash-merged, either is fine!)
Update the UPGRADING.md if the change you've made is breaking and the
instructions should be in place for a user on how he/she can upgrade it's
software (ABCI application, Tendermint-based blockchain, light client, wallet).
Once you have submitted a pull request label the pull request with either R:minor, if the change should be included in the next minor release, or R:major, if the change is meant for a major release.
Sometimes (often!) pull requests get out-of-date with master, as other people merge different pull requests to master. It is our convention that pull request authors are responsible for updating their branches with master. (This also means that you shouldn't update someone else's branch for them; even if it seems like you're doing them a favor, you may be interfering with their git flow in some way!)
Merging Pull Requests
It is also our convention that authors merge their own pull requests, when possible. External contributors may not have the necessary permissions to do this, in which case, a member of the core team will merge the pull request once it's been approved.
Before merging a pull request:
- Ensure pull branch is up-to-date with a recent
master(GitHub won't let you merge without this!) - Run
make testto ensure that all tests pass - Squash merge pull request
Pull Requests for Minor Releases
If your change should be included in a minor release, please also open a PR against the long-lived minor release candidate branch (e.g., rc1/v0.33.5) immediately after your change has been merged to master.
You can do this by cherry-picking your commit off master:
$ git checkout rc1/v0.33.5
$ git checkout -b {new branch name}
$ git cherry-pick {commit SHA from master}
# may need to fix conflicts, and then use git add and git cherry-pick --continue
$ git push origin {new branch name}
After this, you can open a PR. Please note in the PR body if there were merge conflicts so that reviewers can be sure to take a thorough look.
Git Commit Style
We follow the Go style guide on commit messages. Write concise commits that start with the package name and have a description that finishes the sentence "This change modifies Tendermint to...". For example,
cmd/debug: execute p.Signal only when p is not nil

[potentially longer description in the body]

Fixes #nnnn
Each PR should have one commit once it lands on master; this can be accomplished by using the "squash and merge" button on Github. Be sure to edit your commit message, though!
Release Procedure
Major Release
- start on
master - run integration tests (see
test_integrationsin Makefile) - prepare release in a pull request against
master(to be squash merged):- copy
CHANGELOG_PENDING.mdto top ofCHANGELOG.md - run
python ./scripts/linkify_changelog.py CHANGELOG.mdto add links for all issues - run
bash ./scripts/authors.shto get a list of authors since the latest release, and add the github aliases of external contributors to the top of the changelog. To lookup an alias from an email, trybash ./scripts/authors.sh <email> - reset the
CHANGELOG_PENDING.md - bump Tendermint version in
version.go - bump P2P and block protocol versions in
version.go, if necessary - bump ABCI protocol version in
version.go, if necessary - make sure all significant breaking changes are covered in
UPGRADING.md
- copy
- push your changes with prepared release details to
vX.X(this will trigger the releasevX.X.0) - merge back to master (don't squash merge!)
Minor Release
Minor releases are done differently from major releases: They are built off of long-lived release candidate branches, rather than from master.
- Checkout the long-lived release candidate branch:
git checkout rcX/vX.X.X - Run integration tests:
make test_integrations - Prepare the release:
- copy
CHANGELOG_PENDING.mdto top ofCHANGELOG.md - run
python ./scripts/linkify_changelog.py CHANGELOG.mdto add links for all issues - run
bash ./scripts/authors.shto get a list of authors since the latest release, and add the GitHub aliases of external contributors to the top of the CHANGELOG. To lookup an alias from an email, trybash ./scripts/authors.sh <email> - reset the
CHANGELOG_PENDING.md - bump Tendermint version in
version.go - bump P2P and block protocol versions in
version.go, if necessary - bump ABCI protocol version in
version.go, if necessary - make sure all significant breaking changes are covered in
UPGRADING.md
- copy
- Create a release branch
release/vX.X.xoff the release candidate branch:git checkout -b release/vX.X.xgit push -u origin release/vX.X.x- Note that all branches prefixed with
releaseare protected once pushed. You will need admin help to make any changes to the branch.
- Open a pull request of the new minor release branch onto the latest major release branch
vX.Xand then rebase to merge. This will start the release process. - Create a pull request back to master with the CHANGELOG & version changes from the latest release.
- Remove all
R:minorlabels from the pull requests that were included in the release. - Do not merge the release branch into master.
- Remove all
- Delete the former long lived release candidate branch once the release has been made.
- Create a new release candidate branch to be used for the next release.
Backport Release
- start from the existing release branch you want to backport changes to (e.g. v0.30) Branch to a release/vX.X.X branch locally (e.g. release/v0.30.7)
- cherry pick the commit(s) that contain the changes you want to backport (usually these commits are from squash-merged PRs which were already reviewed)
- steps 2 and 3 from Major Release
- push changes to release/vX.X.X branch
- open a PR against the existing vX.X branch
Testing
All repos should be hooked up to CircleCI.
If they have .go files in the root directory, they will be automatically
tested by circle using go test -v -race ./.... If not, they will need a
circle.yml. Ideally, every repo has a Makefile that defines make test and
includes its continuous integration status using a badge in the README.md.
RPC Testing
If you contribute to the RPC endpoints it's important to document your changes in the Swagger file
To test your changes you should install nodejs and run:
npm i -g dredd
make build-linux build-contract-tests-hooks
make contract-tests
This command will popup a network and check every endpoint against what has been documented